Tibber historical data
Tibber is on a mission to change the way we buy and consume electricity. In this regard, the company offers customers the ability to lower their energy bills using a simple app, where the purchasing of power is automatically done by its bots. Tibber has a highly unique technology where smart algorithms buy electricity for you automatically.
Tibber integration guide
In this guide, we will show you how to read statistics about your electricity usage from Tibber using Node-RED, process the data, and write it to Clarify.
To be able to follow this guide you will need the following:
- A Tibber subscription
- A developer account from Tibber and an access token.
We will assume that you have basic knowledge and a working instance running Node-RED, if not please read our Introduction and the guide on how to Install Clarify node.
To proceed make sure you have the following easily available:
Tibber username (your registered email) and password Your application client ID and client secret
Querying Tibber
Tibber uses a GraphQL API and we can use their developer page to create a query that will return the data we need. To do so, head on over to their developer portal sign in and open the API Explorer.
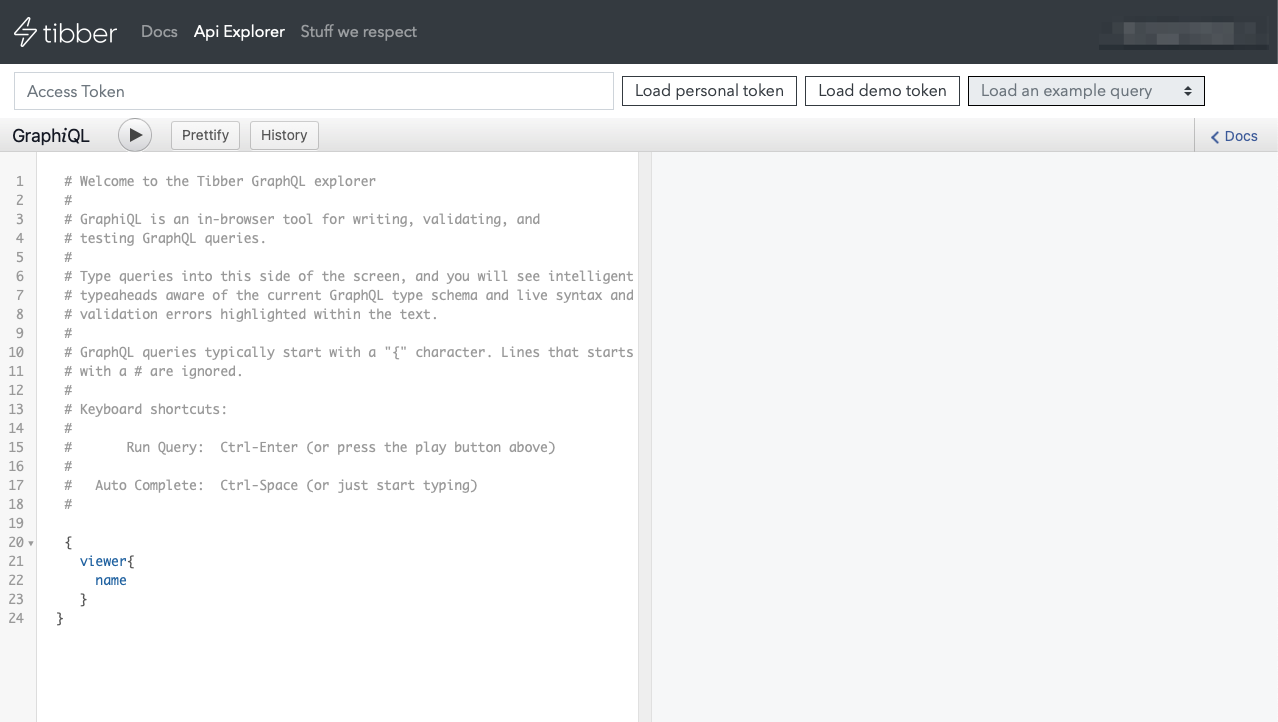
Click the "Load personal token" button to get your access token, you will need this both for the API Explorer, and later when configuring the Node-RED flow. You can play around with the API Explorer to learn more about the different queries, but for this example we have provided the appropriate query. Copy the query from below, and paste it into the query editor.
{
  viewer {
    homes {
      id
      address {
        address1
        postalCode
        city
        country
        latitude
        longitude
      }
      consumption(resolution: HOURLY, last: 48) {
        nodes {
          from
          to
          cost
          unitPrice
          unitPriceVAT
          consumption
        }
      }
    }
  }
}
Press the run symbol to run the query, and you should be seeing something like this.
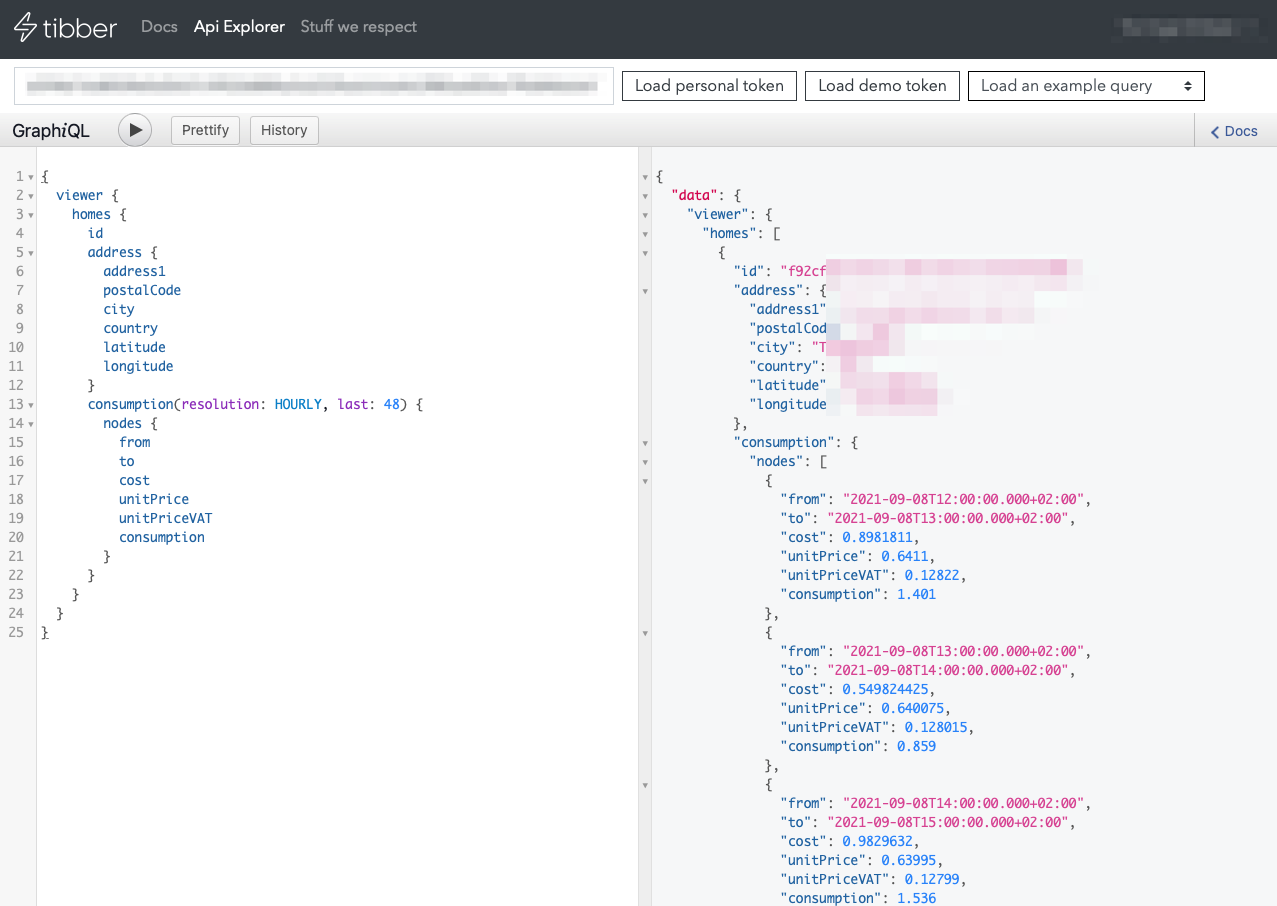
The next step will be replicating this query in Node-RED, so we can process the data and send it to Clarify. Head on over to Node-RED, but keep the API Explorer open because we will need the token.
Installing the Tibber nodes in Node-RED
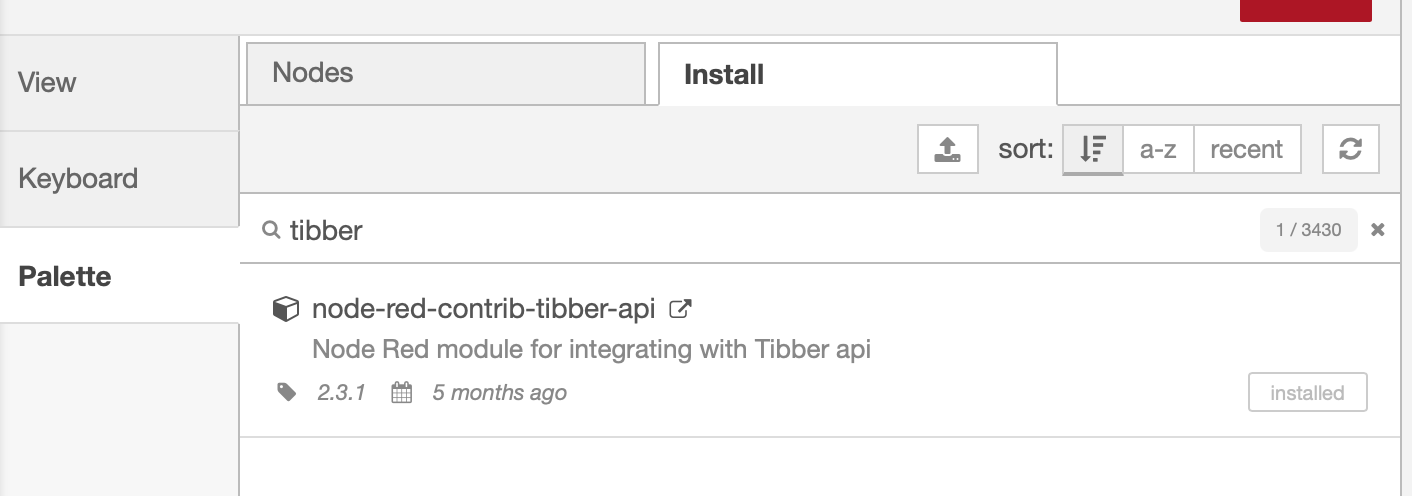
Open the palette and search for node-red-contrib-tibber-api installing this will give us the nodes we need to communicate with Tibber.
Querying Tibber
Once the nodes are installed, we will need to combine inject, function, tibber-query and a debug node. Connect the nodes as shown in the example below

Then open the function node and paste the content shown below in. This will set the query that we created in the Tibber API Explorer in the payload, which we will use in the tibber-query node.
msg.payload = `{
  viewer {
    homes {
      id
      address {
        address1
        postalCode
        city
        country
        latitude
        longitude
      }
      consumption(resolution: HOURLY, last: 48) {
        nodes {
          from
          to
          cost
          unitPrice
          unitPriceVAT
          consumption
        }
      }
    }
  }
}`;
return msg;
The next step is to open the tibber-query node and configuring the API Endpoint. Leave the URLs as they are, then copy the access token from the Tibber Developer page into the "Access Token" field and press "Update".
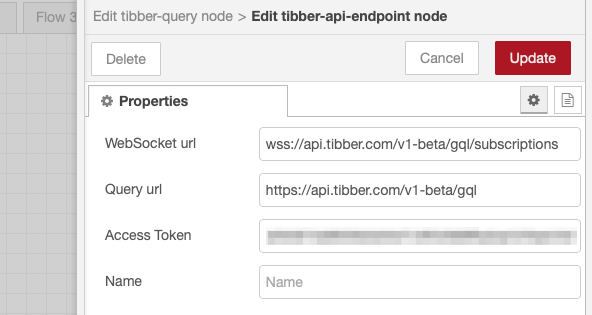
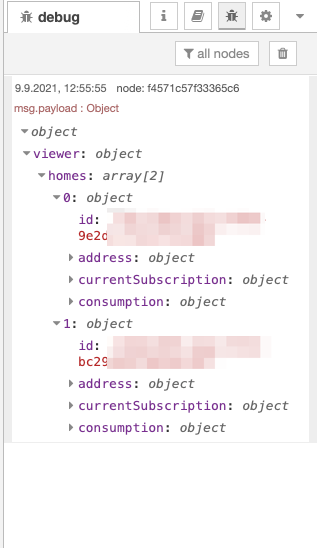
Deploy the flow and press the button on the inject node to test the flow, you should be seeing the result of the query in the debug panel in Node-RED.
Processing for Clarify
The last step of this guide will be to process the data that comes out from the Tibber API into a format that can be inserted into Clarify. To do so, we will first use some blocks to massage the overall layout of the data, and then a function block to do the final processing.
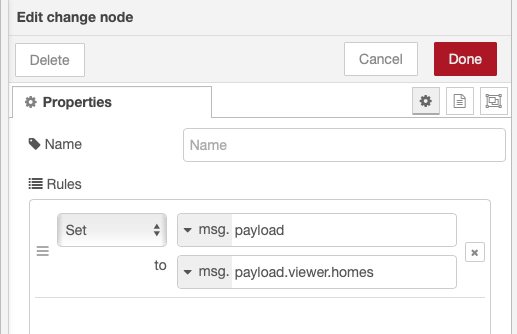
First we will need to map the content of msg.payload.viewer.homes into msg.payload, to do so, place a change block after the tibber-query node and configure it as shown in the screenshot.
Now we can use a split node to create individual messages for each home in the homes array. For many users there will be just one home, but if you have another property in your Tibber account, this will allow us to process each of them separately.
The next step will be to place a function node that will process the data for each home into the format that the clarify-input node expects. Pull in a function node, connect it to the split node and paste in the code below.
return [extractData(msg)];

function extractData({ payload }) {
  let times = [];
  let cost = [];
  let price = [];
  let consumption = [];

  // We need to loop through each available time-
  // stamp and store its values.
  for (let node of payload.consumption.nodes) {
    times.push(new Date(node.to).toISOString());

    let unitPrice = node.unitPrice || 0;
    let unitPriceVAT = node.unitPriceVAT || 0;

    price.push(unitPrice + unitPriceVAT);
    cost.push(node.cost || 0);
    consumption.push(node.consumption || 0);
  }

  // Labels will be shared across the signals, so
  // we define them here.
  let labels = {
    address: [payload.address.address1],
    postalCode: [payload.address.postalCode],
    country: [payload.address.country],
    latitude: [payload.address.latitude],
    longitude: [payload.address.longitude],
  };

  let id = payload.id.substr(payload.id.lastIndexOf("-") + 1);

  return [
    {
      topic: `${id}_cost`,
      signal: {
        name: "Cost",
        labels: labels,
        engUnit: "NOK",
      },
      payload: {
        times: times,
        values: cost,
      },
    },
    {
      topic: `${id}_price`,
      signal: {
        name: "Price",
        labels: labels,
        engUnit: "NOK",
      },
      payload: {
        times: times,
        values: price,
      },
    },
    {
      topic: `${id}_consumption`,
      signal: {
        name: "Consumption",
        labels: labels,
        engUnit: "kWh",
      },
      payload: {
        times: times,
        values: consumption,
      },
    },
  ];
}
The final step is to connect this to a clarify-insert node. A detailed explanation of how to find the correct credentials and configure this node can be found in the guide Using Clarify Nodes.
Your complete flow should now look like this.

If you want this flow to run regularly to get updated data on your power usage, remember to configure the injection node to repeat.
Final remarks
Congratulations, if you've reached this step you have integrated Clarify with Tibber! If you ran into any issues, you can import the flow below into NodeRED to get the full setup used in this tutorial.
[
    {
        "id": "696a54a04658bd04",
        "type": "tab",
        "label": "Flow 4",
        "disabled": false,
        "info": ""
    },
    {
        "id": "d8e45966.529d58",
        "type": "tibber-query",
        "z": "696a54a04658bd04",
        "name": "",
        "active": true,
        "apiEndpointRef": "28ad954b.6301ba",
        "x": 930,
        "y": 100,
        "wires": [
            [
                "adb880377df7166f"
            ]
        ]
    },
    {
        "id": "8ec89770.6b89f8",
        "type": "function",
        "z": "696a54a04658bd04",
        "name": "",
        "func": "msg.payload = \n`{\n  viewer {\n    homes {\n      id\n      address {\n        address1\n        postalCode\n        city\n        country\n        latitude\n        longitude\n      }    \n      consumption(resolution: HOURLY, last: 48) {\n        nodes {\n          from\n          to\n          cost\n          unitPrice\n          unitPriceVAT\n          consumption\n          consumptionUnit\n        }\n      }\n    }\n  }\n}`\nreturn msg;",
        "outputs": 1,
        "noerr": 0,
        "initialize": "",
        "finalize": "",
        "libs": [],
        "x": 740,
        "y": 100,
        "wires": [
            [
                "d8e45966.529d58"
            ]
        ]
    },
    {
        "id": "6e58de2c.29dde",
        "type": "inject",
        "z": "696a54a04658bd04",
        "name": "",
        "props": [
            {
                "p": "payload"
            },
            {
                "p": "topic",
                "vt": "str"
            }
        ],
        "repeat": "43200",
        "crontab": "",
        "once": false,
        "onceDelay": 0.1,
        "topic": "",
        "payload": "",
        "payloadType": "date",
        "x": 570,
        "y": 100,
        "wires": [
            [
                "8ec89770.6b89f8"
            ]
        ]
    },
    {
        "id": "adb880377df7166f",
        "type": "change",
        "z": "696a54a04658bd04",
        "name": "",
        "rules": [
            {
                "t": "set",
                "p": "payload",
                "pt": "msg",
                "to": "payload.viewer.homes",
                "tot": "msg"
            }
        ],
        "action": "",
        "property": "",
        "from": "",
        "to": "",
        "reg": false,
        "x": 1140,
        "y": 100,
        "wires": [
            [
                "8654b2f1281bba39"
            ]
        ]
    },
    {
        "id": "8654b2f1281bba39",
        "type": "split",
        "z": "696a54a04658bd04",
        "name": "",
        "splt": "\\n",
        "spltType": "str",
        "arraySplt": 1,
        "arraySpltType": "len",
        "stream": false,
        "addname": "",
        "x": 1330,
        "y": 100,
        "wires": [
            [
                "8ccc40a38851d946"
            ]
        ]
    },
    {
        "id": "8ccc40a38851d946",
        "type": "function",
        "z": "696a54a04658bd04",
        "name": "",
        "func": "return [extractData(msg)];\n\nfunction extractData({payload}) {\n    let times = [];\n    let cost = [];\n    let price = [];\n    let consumption = [];\n  \n    // We need to loop through each available time-\n    // stamp and store its values. \n    for (let node of payload.consumption.nodes) {\n      times.push(new Date(node.to).toISOString());\n      \n      let unitPrice = node.unitPrice || 0;\n      let unitPriceVAT = node.unitPriceVAT || 0;\n\n      price.push(unitPrice + unitPriceVAT);\n      cost.push(node.cost || 0)\n      consumption.push(node.consumption || 0)\n    }\n    \n    // Labels will be shared across the signals, so \n    // we define them here. \n    let labels =  {\n      \"address\": [payload.address.address1],\n      \"postalCode\": [payload.address.postalCode],\n      \"country\": [payload.address.country],\n      \"latitude\": [payload.address.latitude],\n      \"longitude\": [payload.address.longitude]\n    }\n    \n    let id = payload.id.substr(payload.id.lastIndexOf('-') + 1);\n\n    return [\n      {\n        topic: `${id}_cost`,\n        signal: {\n            name: \"Cost\",\n            labels: labels,\n            engUnit: \"NOK\"\n        },\n        payload: {\n            times: times,\n            values: cost\n        }\n    },\n    {\n      topic: `${id}_price`,\n      signal: {\n          name: \"Price\",\n          labels: labels,\n          engUnit: \"NOK\"\n      },\n      payload: {\n          times: times,\n          values: price\n      }\n  },\n  {\n    topic: `${id}_consumption`,\n    signal: {\n        name: \"Consumption\",\n        labels: labels,\n        engUnit: \"kWh\"\n    },\n    payload: {\n        times: times,\n        values: consumption\n    }\n  }];\n}",
        "outputs": 1,
        "noerr": 0,
        "initialize": "",
        "finalize": "",
        "libs": [],
        "x": 1510,
        "y": 100,
        "wires": [
            [
                "c5aaf0ba1a77e1e0"
            ]
        ]
    },
    {
        "id": "c5aaf0ba1a77e1e0",
        "type": "clarify_insert",
        "z": "696a54a04658bd04",
        "name": "",
        "apiRef": "cfc4fd553fe2b812",
        "bufferTime": "5",
        "x": 1690,
        "y": 100,
        "wires": [
            [],
            []
        ]
    },
    {
        "id": "28ad954b.6301ba",
        "type": "tibber-api-endpoint",
        "feedUrl": "wss://api.tibber.com/v1-beta/gql/subscriptions",
        "queryUrl": "https://api.tibber.com/v1-beta/gql",
        "name": ""
    },
    {
        "id": "cfc4fd553fe2b812",
        "type": "clarify_api",
        "name": "TibberGuide1.0"
    }
]
If you found any errors, ambiguities or have any suggestions on how to make this guide better, please contact us via chat or send an email to hello@clarify.io 🙌
Disclaimer By using our guides you agree to the following disclaimer.