OPCUA (Node-RED)
OPC UA stands for Open Platform Communications Unified Architecture. It is an extensible, platform-independent standard that enables the secure exchange of information in industrial systems. Basically speaking it's a protocol that lets equipment and servers from different vendors speak together. Read more about it here.

For this guide, we will be reusing our office demo-wall control system. In the Modbus guide we configured Beijer IX Runtime to expose random values via a Modbus server. The runtime also supports exposing the same variables via OPCUA, which we will use in this guide.
If you would like to follow this guide, but do not have an OPCUA server at hand, fear not. There is a publicly available demo server at: opc.tcp://opcuademo.sterfive.com:26543 that exposes some simulated values.
Example NodeIDs:
ns=8;s=Scalar_Simulation_Integer
ns=8;s=Scalar_Simulation_Float
Exploring the OPCUA Namespace with UaExpert
Unified Automation has a fantastic free OPUA Client called UaExpert that allows you to connect to any OPCUA Server and perform all supported operations like browsing, read/write and subscribe to tags. Running this on the same network as the demo wall lets us connect and subscribe to the tags on the IX-Runtime. This is an easy way to discover the NodeIDs for the tags we are interested in.
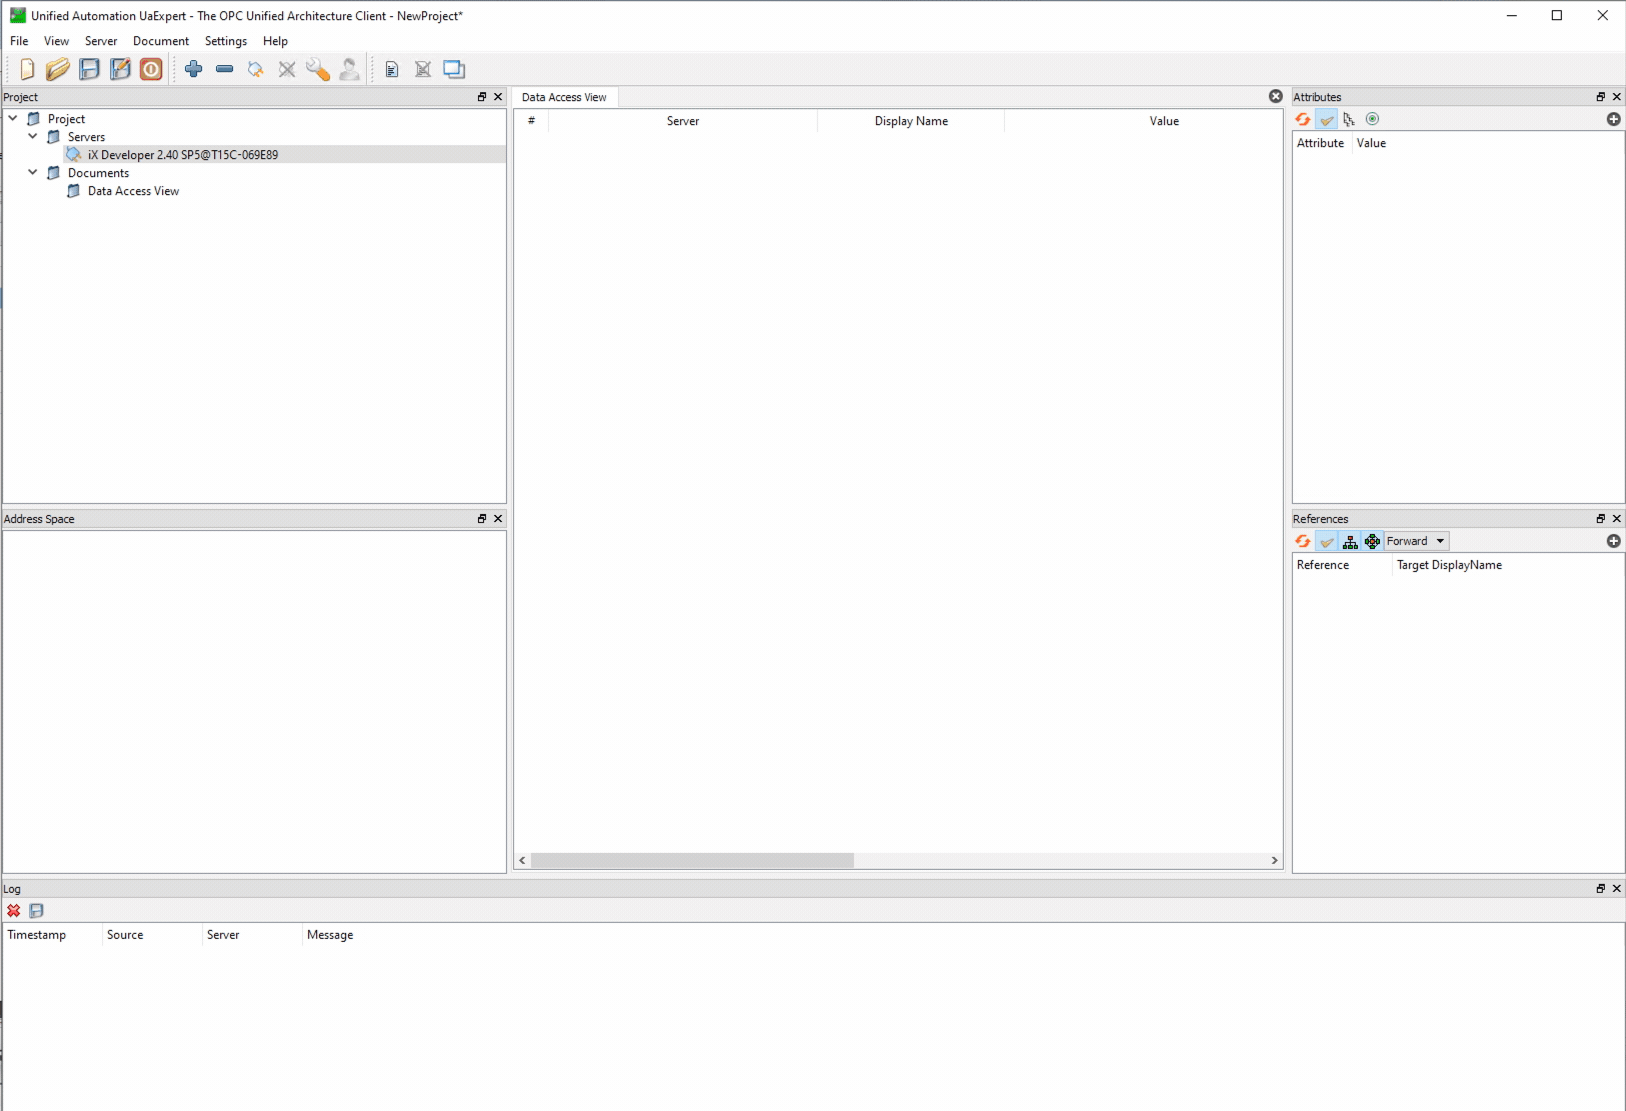
In OPC UA, every entity in the address space is a node. To uniquely identify a node, each node has a NodeId that consists of a namespace and an identifier.
Read more about NodeIDs here
Installing the OPCUA Nodes in Node-RED
Search for and install node-red-contrib-opcua from the palette in Node-RED. This will enable a set of OPCUA Nodes, but in this guide, we will only use the OPCUA Client.
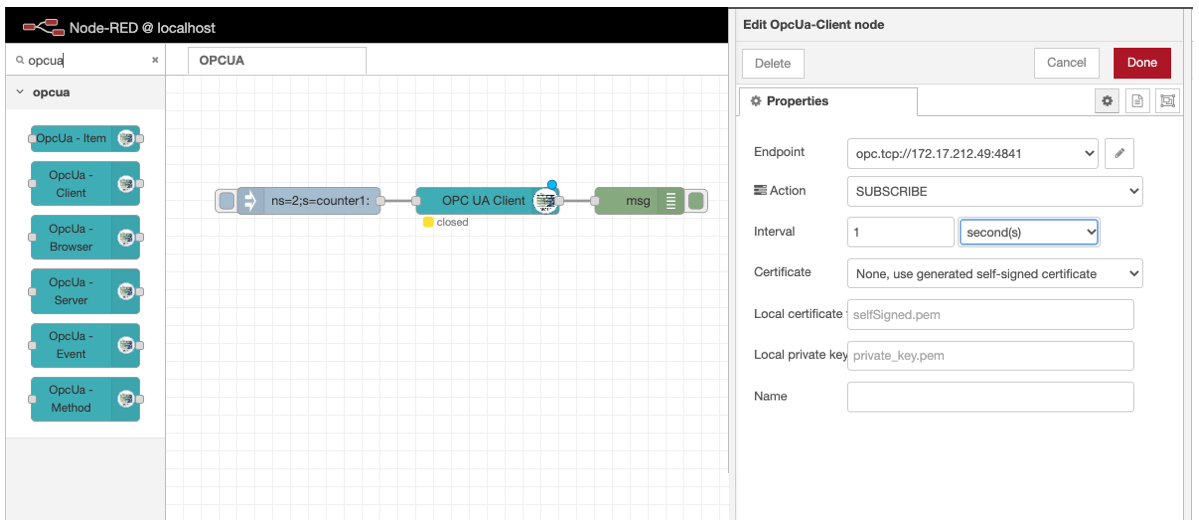
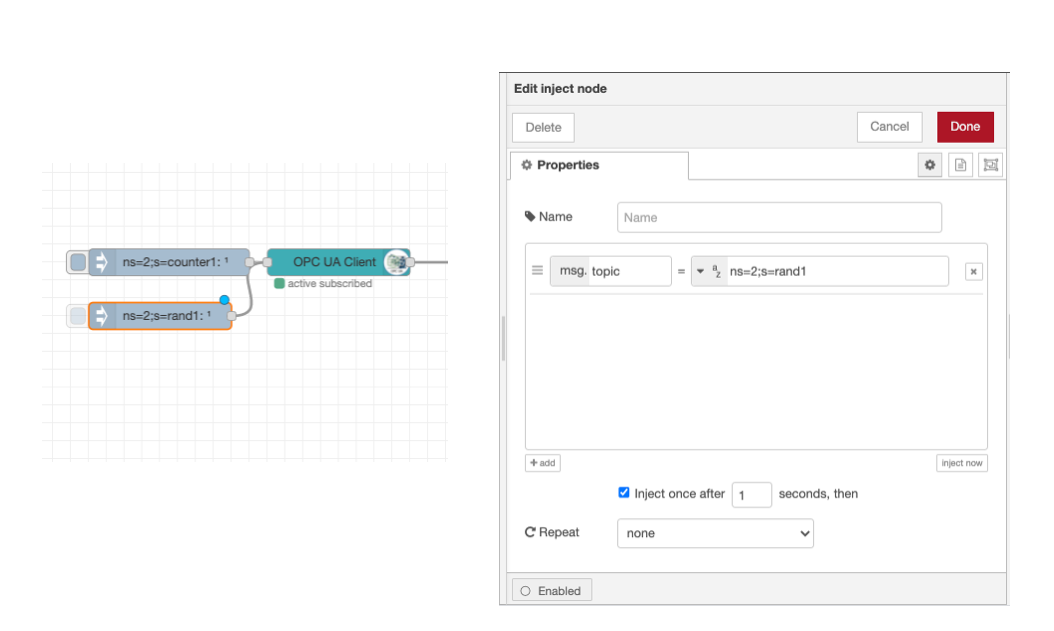
Drag in the OPC UA Client node along with an insert node and a debug node. (see screenshot above). Configure the UA Client with the address and credentials for your OPCUA server and choose the SUBSCRIBE action together with an appropriate interval. Put some thought into how often you need updates for the tags you are logging, and if all changes are vital you should consider using the MONITOR action with a defined dead-band.
Set the inject node to inject a message with the nodeID as the topic. For our example, we'll subscribe to the same tag as in the Modbus example, namely the counter. The nodeID is found when browsing with UaExpert.
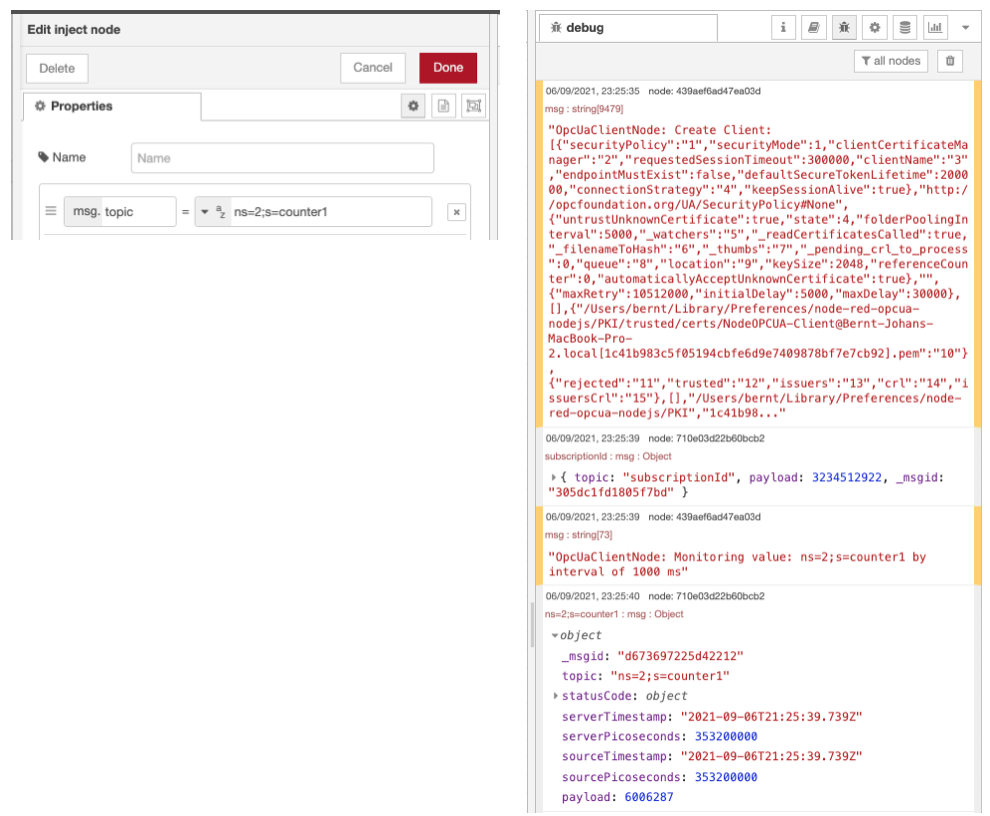
After deploying the flow you should see the status of the client node change to green, indicating that it has been successfully connected, and clicking the inject node should trigger a subscription and several messages in the debug window.
Processing for Clarify
The OPCUA Client node sends different messages, both values and status updates on the same output. Since we are only interested in writing values to Clarify there is a need to filter the messages. Luckily each message containing a value has a field called msg.StatusCode, so we insert a switch node that will trigger on that field and it will send all messages with value == 0 on the first output and others on the second.
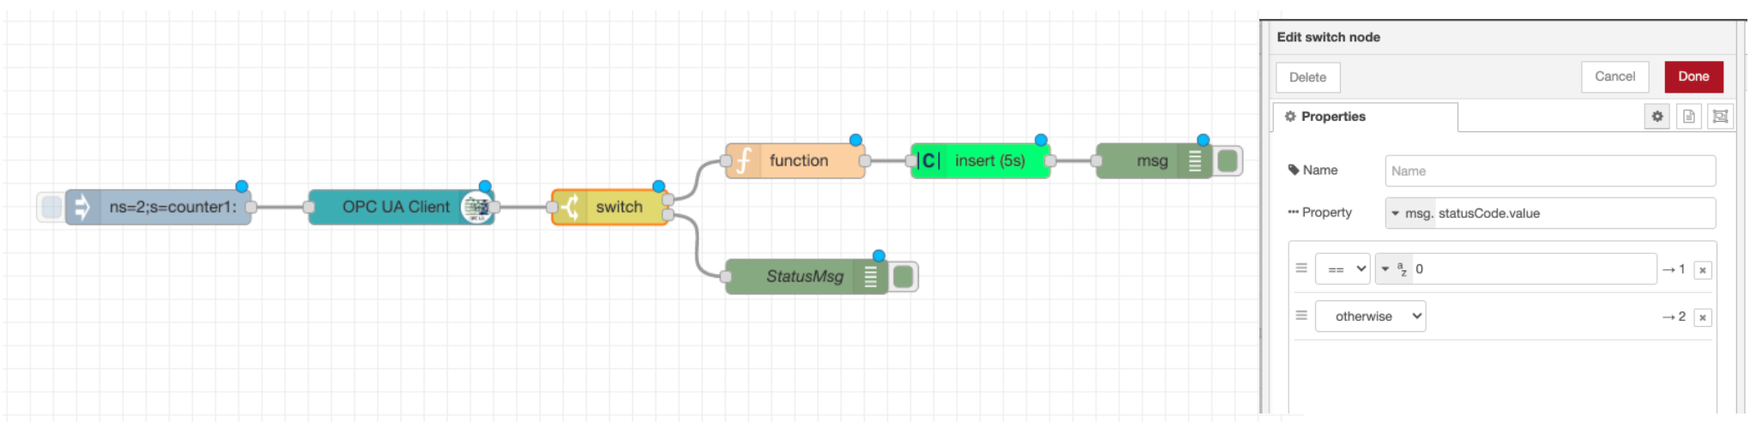
We also add a function node to transform the OPCUA message into a Clarify compatible format before we feed it into the Clarify Insert Node. All the details on setting up and using the Clarify Nodes can be found in this guide Using Clarify Nodes.
Inside the function node, we use the following code to extract the value and timestamp from the OPCUA message. Since the Clarify input ID has some limitations, we transform the NodeID using a regex (^[a-zA-Z0-9-_:.#+/]{1,128}$) to make sure it's accepted. We also add the unchanged NodeID as a label for the signal in Clarify.
let id = msg.topic.replace(/[^a-zA-Z0-9-_:.#+/]+/gi, "-");
let signal = {
  labels: {
    nodeID: [msg.topic],
  },
};
let payload = {
  times: [msg.sourceTimestamp.toISOString()],
  values: [msg.payload],
};

msg.topic = id;
msg.signal = signal;
msg.payload = payload;

return msg;
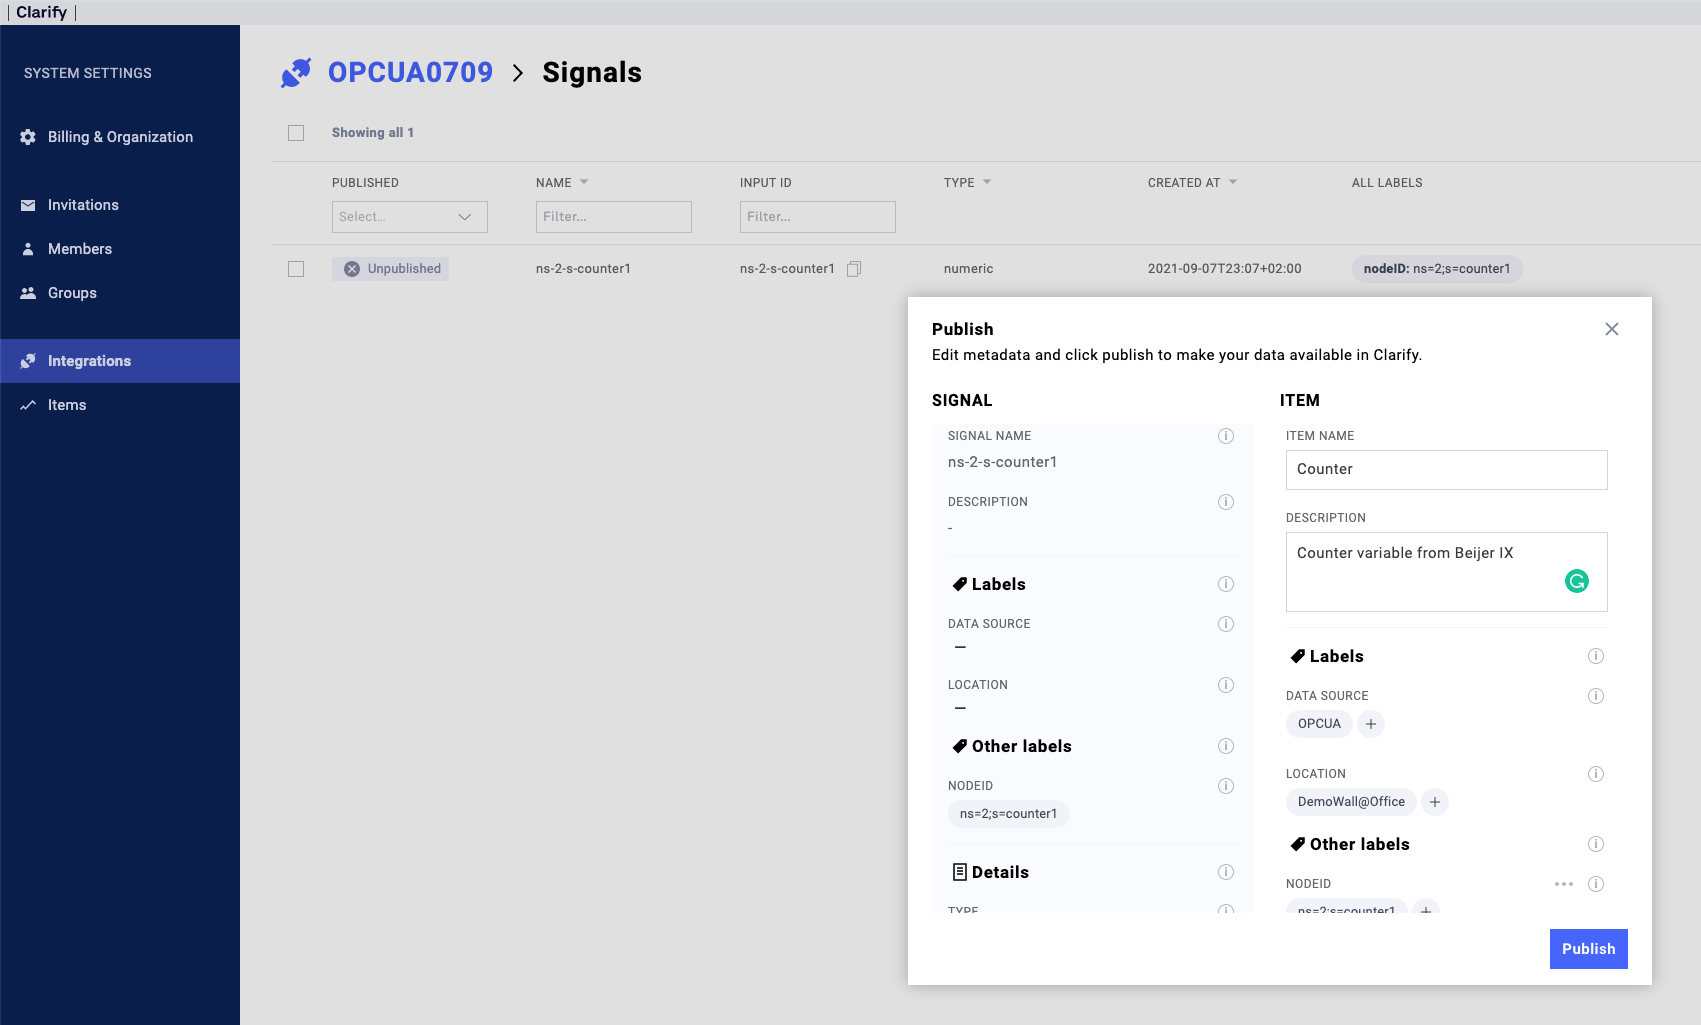
After deploying again and triggering the inject node again we see that the Clarify Insert Node begins registering incoming data and when inspecting the Clarify Admin panel we see the newly created signal.
Subscribing to more OPCUA tags could be done by creating multiple inject nodes. If you would like the subscription to automatically start when the flow is deployed (or the Node-RED server is restarted) you could check the Inject once after __ seconds checkbox in the deploy node.
We now have a working OPCUA integration in Node-RED writing data to our Clarify Instance.
If you found any errors, ambiguities or have any suggestions on how to make this guide better, please contact us via chat or send an email to hello@clarify.io 🙌
Disclaimer By using our guides you agree to the following disclaimer.