MQTT Sparkplug B (Node-RED)
MQTT Sparkplug is an extension to MQTT that specifies the payload structure of the messages. This allows interoperability between different devices and manufacturers, a critical component especially when bridging OT and IT systems.
The specification was initially developed by Cirrus Link, and is managed today by the Eclipse Foundation in the Eclipse Tahu project.

In this example we'll first show you how you can subscribe to an MQTT Broker and parse available Sparkplug B messages. Once we've successfully read and parsed the messages, we will look at how to map Sparkplug B formatted messages into a format that Clarify understands. This will effectively let us use Clarify as a time series storage for any data coming through the Sparkplug B format.
Let's just jump right into it!
We will assume that you have basic knowledge and a working instance running Node-RED, if not please read our Introduction and the guide on how to Install Clarify node.
Note that this guide only covers subscribing to messages, in order for you to have Sparkplug B messages to parse, you will need to connect a demo application or actual equipment to the broker.
Reading Sparkplug B messages
In order to begin receiving MQTT messages, we will use the mqtt-in node from Node-RED. Start by dragging this into an empty flow and double-click to configure it.
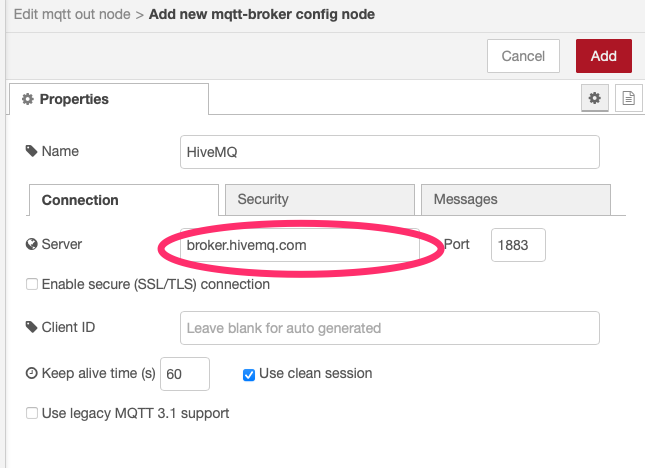
If you don't have access to an MQTT Broker and don't want to set one up, you can connect to a Public MQTT Broker for this example. We like HiveMQs broker which you can find at broker.hivemq.com:1883.
Going forward we will use the public brokers address in the examples, simply substitute this for your own if you want to connect to another broker.
Configure the node with the brokers address and the appropriate port and then press "Add" when you are done.
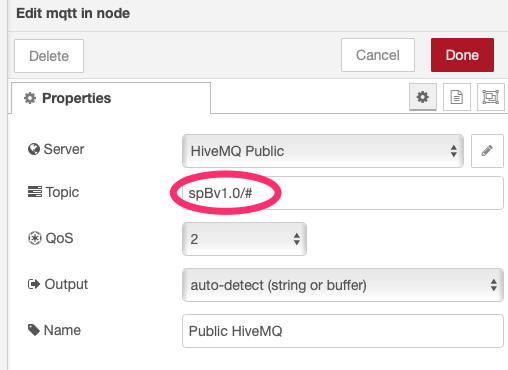
The next thing we need to do is select a topic or topics to subscribe to. Since we are working with Sparkplug B data, the convention is that these should be published under the spBv1.0/ namespace. To listen to any topic in this space, we can set the topic of the mqtt-in node to spBv1.0/#.
Next we drag in a debug node and connect it to the mqtt-in node to verify that things are working.
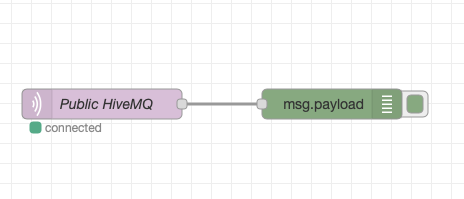
If things are working, you should be seeing the debug log filling up with messages containing a byte buffer. This is the raw Sparkplug B format which is actually a Protobuf encoded message.
Parsing protobuf
The first step in parsing the protobuf messages is installing the node that is able to parse the incoming messages using a .proto file. Open the palette and install node-red-contrib-protobuf. This will give us two nodes for encoding and decoding protobuf encoded data. Drag in the decode node and connect it to the output of the MQTT node.
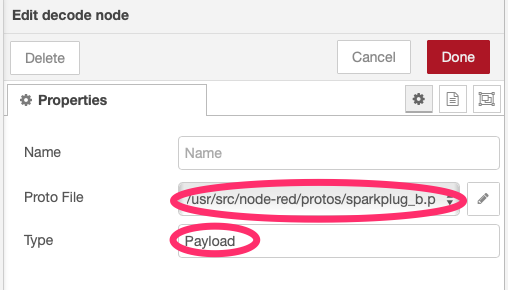
For the next step, you will need to download a .proto file that tells the decode node what the payload should look like. Head on over to Cirrus-Link/Sparkplug and download this file to a location that can be read by your Node-RED installation.
Finally configure the decode node with the location of the .proto file and set "Type" to "Payload".
Now we will connect the output of the decode node to a debug node in order to see the parsed message. Make sure you set the output of the debug node to "complete msg object" to be able to see the full message. At this point, your flow should look like this:
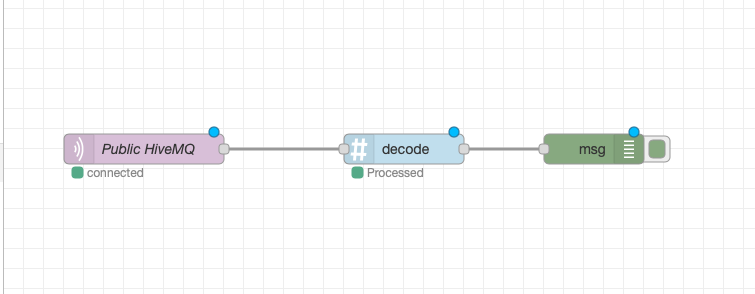
Deploy the flow, and open the debug window to see the output. Note that the actual content of the parsed message will vary depending on what's being published to your broker.
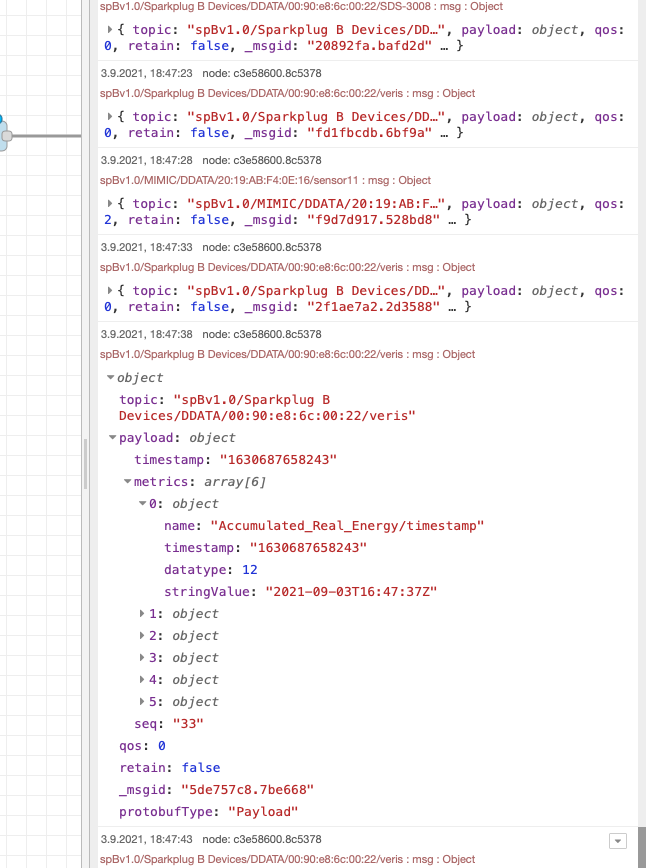
Processing for Clarify
For the final step of this guide, we will process the incoming messages and send them to Clarify. This will create signals in Clarify and forward all data coming in through the Sparkplug connection to our organization in Clarify.
For a full overview of all the available message types, you can check out the MQTT Sparkplug B specifications.
To parse the incoming messages, we need to place a switch node and a function node between the decode step and the debug output. The switch node will be used to filter messages based on their type since we will only be covering parsing of the DDATA message type in this guide, while the function node will contain the actual parsing.
After you have placed both your nodes, your flow should look like what's shown below.

Open the switch node and configure it to allow messages containing DDATA in their topic.
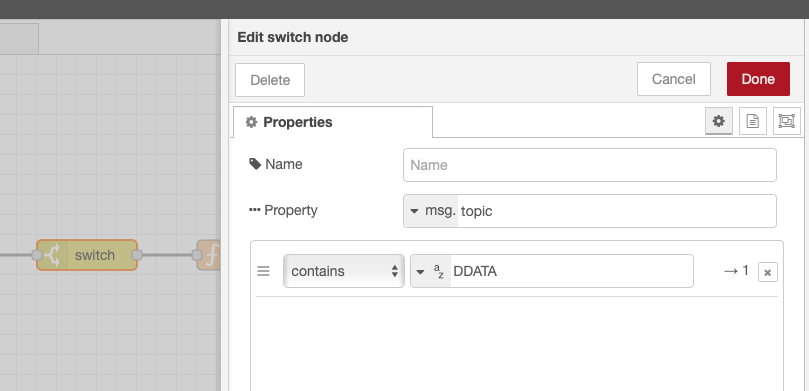
Finally, open the function node and paste this code in the editor for the "On Message" tab.
return [extractData(msg)];

function extractData({ payload }) {
  let res = [];

  for (let metric of payload.metrics) {
    if (metric.datatype > 11) {
      continue;
    }

    let val = getMetricValue(metric);

    res.push({
      // When sending data to Clarify, the
      // topic in NodeRED is used as the `input-id`
      // which uniquely identifies a signal when writing
      // data. In order to get a unique ID of this
      // metric while staying within the requirements
      // of IDs in Clarify, we create a hash of the
      // topic and the name.
      topic: hashCode(msg.topic + metric.name),

      // This section contains the meta-information
      // about the signal. We only send the topic and
      // name for now, but this could be extended to
      // contain properties.
      signal: {
        name: metric.name,
        labels: {
          topic: [msg.topic],
        },
      },

      // Finally we insert the timestamp and value
      // of the metric.
      payload: {
        times: [new Date(parseInt(metric.timestamp)).toISOString()],
        values: [val],
      },
    });
  }

  return res;
}

function hashCode(s) {
  return s.split("").reduce(function (a, b) {
    a = (a << 5) - a + b.charCodeAt(0);
    return a & a;
  }, 0);
}

function getMetricValue(metric) {
  // We handle each data type which we
  // want to support individually. Unsupported
  // data types will be skipped.
  switch (metric.datatype) {
    case (1, 2, 3, 4, 5, 6):
      return metric.intValue;
      break;
    case (7, 8):
      return metric.longValue;
      break;
    case 9:
      return metric.floatValue;
      break;
    case 10:
      return metric.doubleValue;
      break;
    case 11:
      return metric.booleanValue;
      break;
    default:
      return;
  }
}
Deploy your application, and you should now be seeing messages formatted in a way that is compatible with the clarify-insert node.
{
    "topic": -202185215,
    "signal": {
        "name": "Cost",
        "labels": {
            "topic": [
                "spBv1.0/house/DDATA/electricity"
            ]
        }
    },
    "payload": {
        "times": [
            "2021-09-07T09:00:00.000Z"
        ],
        "values": [
            14.23
        ]
    },
    "_msgid": "f28abd86c0599614"
}
The final step is to connect this to a clarify-insert node. A detailed explanation of how to find the correct credentials and configure this node can be found in the guide Using Clarify Nodes.
Your complete flow should now look like this.

Final remarks
The flow below can be imported into Node-RED to get the full setup used in this tutorial.
[
    {
        "id": "350fb9fbb98012be",
        "type": "tab",
        "label": "Flow 3",
        "disabled": false,
        "info": ""
    },
    {
        "id": "c2b1a08958f6a455",
        "type": "mqtt in",
        "z": "350fb9fbb98012be",
        "name": "Public HiveMQ",
        "topic": "spBv1.0/#",
        "qos": "1",
        "datatype": "auto",
        "broker": "",
        "nl": false,
        "rap": false,
        "rh": "0",
        "x": 500,
        "y": 160,
        "wires": [
            [
                "c6158ecd8c6c7408"
            ]
        ]
    },
    {
        "id": "c6158ecd8c6c7408",
        "type": "decode",
        "z": "350fb9fbb98012be",
        "name": "",
        "protofile": "ed5f1781.b90ea8",
        "protoType": "Payload",
        "x": 680,
        "y": 160,
        "wires": [
            [
                "9a097a4ef3ae74f4"
            ]
        ]
    },
    {
        "id": "b9fad2be5ef9bc88",
        "type": "function",
        "z": "350fb9fbb98012be",
        "name": "",
        "func": "return [extractData(msg)];\n\nfunction extractData({payload}) {\n    let res = [];\n    \n    for (let metric of payload.metrics) {\n        if (metric.datatype > 11) {\n            continue\n        }\n        \n        let val = getMetricValue(metric);\n\n        \n        res.push({\n            // When sending data to Clarify, the \n            // topic in NodeRED is used as the `input-id`\n            // which uniquely identifies a signal when writing\n            // data. In order to get a unique ID of this\n            // metric while staying within the requirements \n            // of IDs in Clarify, we create a hash of the \n            // topic and the name.\n            topic: hashCode(msg.topic + metric.name),\n            \n            // This section contains the meta-information\n            // about the signal. We only send the topic and \n            // name for now, but this could be extended to \n            // contain properties. \n            signal: {\n                name: metric.name,\n                labels: {\n                    \"topic\": [msg.topic]\n                }\n            },\n            \n            // Finally we insert the timestamp and value\n            // of the metric. \n            payload: {\n                times: [new Date(parseInt(metric.timestamp)).toISOString()],\n                values: [val]\n            }\n        })\n    }\n    \n    return res\n}\n\nfunction hashCode(s){\n  return s.split(\"\").reduce(function(a,b){a=((a<<5)-a)+b.charCodeAt(0);return a&a},0);              \n}\n\nfunction getMetricValue(metric) {\n    // We handle each data type which we \n    // want to support individually. Unsupported\n    // data types will be skipped.\n    switch(metric.datatype) {\n      case 1,2,3,4,5,6:\n        return metric.intValue\n        break;\n      case 7,8:\n        return metric.longValue\n        break;\n      case 9:\n        return metric.floatValue\n        break;\n      case 10:\n        return metric.doubleValue\n        break;\n      case 11:\n        return metric.booleanValue\n        break;\n      default:\n        return\n    }\n}\n\n",
        "outputs": 1,
        "noerr": 0,
        "initialize": "",
        "finalize": "",
        "libs": [],
        "x": 1000,
        "y": 160,
        "wires": [
            [
                "181e4805313acaa4"
            ]
        ]
    },
    {
        "id": "9a097a4ef3ae74f4",
        "type": "switch",
        "z": "350fb9fbb98012be",
        "name": "",
        "property": "topic",
        "propertyType": "msg",
        "rules": [
            {
                "t": "cont",
                "v": "DDATA",
                "vt": "str"
            }
        ],
        "checkall": "true",
        "repair": false,
        "outputs": 1,
        "x": 850,
        "y": 160,
        "wires": [
            [
                "b9fad2be5ef9bc88"
            ]
        ]
    },
    {
        "id": "181e4805313acaa4",
        "type": "clarify_insert",
        "z": "350fb9fbb98012be",
        "name": "",
        "apiRef": "",
        "bufferTime": "5",
        "x": 1180,
        "y": 160,
        "wires": [
            [],
            []
        ]
    },
    {
        "id": "ed5f1781.b90ea8",
        "type": "protobuf-file",
        "protopath": "/data/sparkb.proto",
        "watchFile": true
    }
]
If you found any errors, ambiguities or have any suggestions on how to make this guide better, please contact us via chat or send an email to hello@clarify.io 🙌
Disclaimer By using our guides you agree to the following disclaimer.